If you’ve ever struggled with forms that have too many fields and feel overwhelming for users, this Power Apps modern tabbed interface approach might just be the solution you’re looking for. Let’s dive into the steps I took to make it happen, and there’s even an associated video at the bottom!
Power Apps Modern Tabbed Form Step by Step
Step 1: Adding the Tab List Control
To get started in Power Apps, open your app and go to a form already on a screen. From the Insert menu, select the Tab List control—it’s simply called “Tab List” in the menu. This is the foundation of our tabbed interface, and it’s so much simpler than the old ways of creating tabs with buttons or galleries.
Step 2: Setting Up Tab Sections
Decide what your tabs will be named. For this demo, I chose three: “Purchase Request Info,” “Vendor,” and “Details.” Go to the Items property of the Tab List control and enter the names as a list, like this:
["PR Info", "Vendor", "Details"]
This instantly created my tabs—super easy and a huge time-saver compared to manually building tab-like buttons!
Step 3: Determining the Selected Tab
To figure out which tab the user is on, use this expression: TabList1.Selected.Value. To test it out, you can add a temporary text box to the canvas and set its Text property to TabList1.Selected.Value. This lets you see the name of the selected tab in real-time as you click through them. It’s a great way to confirm everything’s working as expected.
Step 4: Controlling Card Visibility
Now comes the fun part—making the right fields show up on the right tabs. Select a card in your form (those little containers for each field), go to its Visible property, and add a formula to control when it appears. For example, for a card that should only show on the “Purchase Request Info” tab, I entered:
TabList1.Selected.Value = "PR Info"
This means the card is visible only when that tab is active.
Step 5: Applying Visibility to All Cards
Repeat Step 4 for every card in the form, tweaking the formula based on which tab each card belonged to. For instance, vendor-related fields got TabList1.Selected.Value = “Vendor”, and details like justification and budget code got TabList1.Selected.Value = “Details”. To speed things up, I held down the Ctrl key and clicked multiple cards in the left pane to update their visibility settings all at once.
Step 6: Setting a Default Tab on the Power Apps Modern Tabbed Form
You most likely want users to start on your first tab every time they open the form. To make this happen, create a variable. In the OnVisible property of the screen, add this formula, using the name of your first tab:
Then, select the tab control and choose the property called DefaultSelectedItems, and type the name of the variable there:
This ensures the form always opens on that tab, giving users a consistent starting point.
Step 7: Managing Always-Visible Fields
Some fields, like the “Title,” you may want to show on every tab. For those, simply set their Visible property to true without tying them to a specific tab. This way, they’re always there, no matter which tab the user is viewing—perfect for key info that needs to stay front and center.
Step 8: Ensuring Required Fields Are Completed
One challenge with tabbed forms is making sure users fill out all required fields, especially when they’re spread across tabs. Here’s how I tackled it:
Marking Fields as Required: I set the Required property on the card to true for any field that had to be filled out. This automatically adds a little asterisk next to it, so users know it’s mandatory.
Conditional Submit Button: To guide users through the process, I made the submit button visible or enabled only when they reached the “Details” tab (the last one). I set its Visible property to:
TabList1.Selected.Value = "Details"
This encourages them to complete all tabs before submitting.
Form Validity Check: For a smoother experience, I tied the submit button’s DisplayMode to the form’s validity. I used:
This disables the button unless all required fields are filled in, no matter which tab they’re on.
Step 9: Enhancing with Error Messages
You most likely don’t want users guessing why the submit button is disabled, so add a text box near it with a custom error message. Set its Text property to:
"Required fields have not been filled out"
Then, I styled it with red text and bold font for emphasis. To control when it shows, I set its Visible property to:
This makes the message appear only on the last tab when required fields are missing—clear feedback right where it’s needed.
Final Touches
To wrap things up, test the form thoroughly. Click through each tab, filled out fields, and made sure the visibility logic works perfectly.
Why I Love the Power Apps Modern Tab Control
Building this form was a breeze compared to older methods like creating separate screens or faking tabs with buttons. The modern tab control cuts down on steps, saves time, and makes the form so much easier for users to navigate. Whether you’re dealing with purchase requests, vendor info, or detailed data entry, this approach keeps everything tidy and intuitive.
I hope this step-by-step guide inspires you to try it out in your own Power Apps projects. Let me know how it goes—or if you’ve got any creative twists to share! Happy building! Here is the associated video, and thanks to the Power Hour friends who were watching me demonstrate it live and offered helpful suggestions and various ways that some of these things can be accomplished!
To achieve this in a Canvas app, you can follow these steps:
Collect Initial Values on Form Load:
Use the OnVisible property of the screen to create a collection that stores the initial values of the form. For example: ClearCollect(OriginalValues, FormName.Updates) This will store the initial values of the form fields in a collection named OriginalValues.
Track Changes in Field Values:
For each field in the form, compare its current value with the original value stored in the collection. You can use the If function to check for changes. For example: If(DataCardValue.Text <> LookUp(OriginalValues, FieldName = "FieldName").Value, "Changed", "Unchanged")
Collect Changes:
When a field value changes, you can use the OnChange property of the field to update a collection that tracks the changes. For example: Collect(ChangedValues, {FieldName: "FieldName", NewValue: DataCardValue.Text})
Compare Changes:
Use the ChangedValues collection to compare the new values with the original ones. This can help you identify which fields have been modified.
Optional – Highlight Changed Fields:
To visually indicate changes, you can modify the Fill or BorderColor property of the fields based on whether their values have changed. For example: If(DataCardValue.Text <> LookUp(OriginalValues, FieldName = "FieldName").Value, RGBA(255, 0, 0, 1), RGBA(255, 255, 255, 1))
This approach ensures that you can track and compare changes effectively. Let me know if you’d like more detailed guidance on any of these steps!
In this post, I will walk you through the process of creating a content type for SharePoint Online and publishing it to the content type hub for use across all site collections.
NB: You’ll need to be a SharePoint administrator to publish to the hub
What is the content type hub?
Each SharePoint site uses content types, a site comes pre-populated with a set of content types and a set of lists and libraries that use these content types. You can also create your own content types, either being a site content type or list content type, but you can also consume content types from a central location: the content type hub.
Building the content type
In this section, we’ll look at how you can use a combination of JSON and PowerShell to create site columns and content types and then publish them to the content type hub.
The beauty of this approach is, once you’ve created the necessary assets, they become reusable. That means you can edit the code to easily create new content types and even publish content types to multiple tenants.
Create the site columns
The below JSON can be used to create the site coumns we want to use in the training request content type. Create a new file (preferably a JSON file in Visual Studio Code), copy the code, paste and save.
Things to note about the column structure;
internalName should not include spaces
including spaces can cause issues later
group
Default is “Custom Columns”, but I have decided to use a group of my own “Additional 365 Evergreen Columns”
You can help ensure that people enter data consistently and follow the same steps every time they work with a customer by creating a business process flow.
For example, you might want to create a business process flow to have everyone handle customer service requests the same way, or to require that people get approval for an invoice before submitting an order. Business process flows use the same underlying technology as other processes, but the capabilities that they provide are very different from other features that use processes. To learn how to create or edit a business process flow, go to Create a business process flow.
Business process flows provide a guide for people to get work done. They provide a streamlined user experience that leads people through the processes their organization has defined for interactions that need to be advanced to a conclusion of some kind. This user experience can be tailored so that people with different security roles can have an experience that best suits the work they do.
Use business process flows to define a set of steps for people to follow to take them to a desired outcome. These steps provide a visual indicator that tells people where they are in the business process. Business process flows reduce the need for training because new users don’t have to focus on which table they should be using. They can let the process guide them. You can configure business process flows to support common sales methodologies that can help your sales groups achieve better results. For service groups, business process flows can help new staff get up-to-speed more quickly and avoid mistakes that could result in unsatisfied customers.
What business process flows can do
With business process flows, you define a set of stages and steps that are then displayed in a control at the top of the form.
Each stage contains a group of steps. Each step represents a column where data can be entered. You can advance to the next stage by using the Next Stage button. In the unified interface, you can work with a business process flow stage inside the stage flyout or you can pin it to the side pane. Business process flows doesn’t support expanding the stage flyout to the side pane on mobile devices.
You can make a step required so that people must enter data for a corresponding column before they can proceed to the next stage. This is commonly called ”stage-gating”. If you are adding a business-required or system-required column to a business process flow stage, we recommend that you add this column to your form as well.
Business process flows appear relatively simple compared to other types of processes because they don’t provide any conditional business logic or automation beyond providing the streamlined experience for data entry and controlling entry into stages. However, when you combine them with other processes and customizations, they can play an important role in saving people time, reducing training costs, and increasing user adoption.
Note
If any stage, including the current stage, has required columns (except hidden columns), you must fill in the columns on those stages before you save the form or move to a new stage. Disabled columns will still block stage navigation if they are empty and required.
Business process flows integrated with other customizations
When you or your user enters data using business process flows, the data changes are also applied to form columns so that any automation provided by business rules or form scripts can be applied immediately. Steps can be added that set values for columns that are not present in the form and these columns will be added to the Xrm.Page object model used for form scripts. Any workflows that are initiated by changes to columns included in a business process flow will be applied when the data in the form is saved. If the automation is applied by a real-time workflow, the changes will be immediately visible to the user when the data in the form is refreshed after the row is saved.
Although the business process flow control in the form does not provide any direct client-side programmability, changes applied by business rules or form scripts are automatically applied to business process flow controls. If you hide a column in a form, that column will also be hidden in the business process flow control. If you set a value by using business rules or form scripts, that value will be set within the business process flow.
Concurrent process flows
Concurrent business process flows let customizers configure multiple business processes and associate them with the same starting row. Users can switch between multiple business processes running concurrently, and resume their work at the stage in the process that they were on.
System business process flows
The following business process flows are included. To understand how business process flows work, review these system business process flows:
Lead to Opportunity Sales Process
Opportunity Sales Process
Phone to Case Process
Multiple tables in business process flows
You can use a business process flow for a single table or span multiple tables. For example, you may have a process that begins with an opportunity, then continues to a quote, an order, and then an invoice, before finally returning to close the opportunity.
You can design business process flows that tie together the rows for up to five different tables into a single process so that people using the app can focus on the flow of their process rather than on which table they are working in. They can more easily navigate between related table rows.
Multiple business process flows are available per table
Not every user in an organization may follow the same process and different conditions may require that a different process be applied. You can have up to 10 active business process flows per table to provide appropriate processes for different situations.
Control which business process flow will be applied
You can associate business process flows with security roles so that only people with those security roles can see or use them. You can also set the order of the business process flows so that you can control which business process flow will be set by default. This works in the same way that multiple forms for a table are defined.
When someone creates a new table row, the list of available active business process definition is filtered by the user’s security role. The first activated business process definition available for the user’s security role according to the process order list is the one applied by default. If more than one active business process definitions is available, users can load another from the Switch Process dialog. Whenever processes are switched, the one currently rendered goes to the background and is replaced by the selected one, but it maintains its state and can be switched back. Each row can have multiple process instances associated (each for a different business process flow definition, up to a total of 10). On form load, only one business process flow is rendered. When any user applies a different process, that process may only load by default for that particular user.
To make sure a business process is loaded by default for all user (behavior equivalent to “pinning” the process), a custom Client API script (web resource) can be added on form load that specifically loads an existing business process instance based on the business process definition ID.
Business process flow considerations
You can define business process flows only for those tables that support them. You also need to be aware of the limits for the number of processes, stages, and steps that can be added.
Business process flows that call a workflow
You can call on-demand workflows from inside a business process flow. You can configure this from the new business process flow designer by dragging a workflow component to a process stage or to the Global Workflows section. For more information about using workflows in business process flows, see Blog: Business process flow automation in Dynamics 365.
When you include a workflow that you want to trigger on Stage Exit of a stage in your business process flow, and that stage is the last stage in the flow, the designer gives the impression that the workflow will be triggered when that stage is completed. However, the workflow won’t be triggered because a stage transition does not take place. You won’t receive a warning or error preventing you from including the workflow on the stage. When a user interacts with the business process flow, finishing or abandoning the process does not result in a stage transition, and therefore the workflow is not triggered. Consider the following examples:
You create a business process flow with two stages, S1 connects to S2, with a workflow on stage S2 and set the trigger to Stage Exit.
You create a business process flow with three stages, S1 connect to S2, then S2 branches to S3. You include a workflow on S2 and set the trigger to Stage Exit.
The workflow won’t trigger in either case. To work around this issue, you can add a Global Workflow and add the workflow you want to trigger to it so that the workflow is triggered for the business process rather than a stage of the process. You can set the trigger for a Global workflow to Process Abandoned or Process Completed to cause the workflow to trigger when a user abandons or completes the business process.
Tables that can use business process flows
All custom tables can use business process flows. The following standard tables can also use business process flows:
Account
Appointment
Campaign
Campaign Activity
Campaign Response
Competitor
Contact
Email
Entitlement
Fax
Case
Invoice
Lead
Letter
Marketing List
Opportunity
Phone Call
Product
Price List Item
Quote
Recurring Appointment
Sales Literature
Social Activity
Order
User
Task
Team
To enable a custom table for business process flows, select the Business process flows (columns will be created) check box in the table definition. Note that you can’t undo this action.
Note
If you navigate to the business process flow stage that contains the Social Activity table and choose the Next Stage button, you’ll see the Create option. When you choose Create, the Social Activity form loads. However, because Social Activity isn’t valid for Create from the app user interface, you won’t be able to save the form and you’ll see the error message: “Unexpected error.”
Maximum number of processes, stages, and steps
To ensure acceptable performance and the usability of the user interface, there are some limitations you need to be aware of when you plan to use business process flows:
There can be no more than 10 activated business process flow processes per table.
Each process can contain no more than 30 stages.
Multi-table processes can contain no more than five tables.
Business process flow table customization support
Introduced in the Dynamics 365 (online), version 9.0 update, business process flow tables can appear in the system so that table row data can be made available in grids, views, charts, and dashboards.
Use business process flow table rows with grids, views, charts, and dashboards
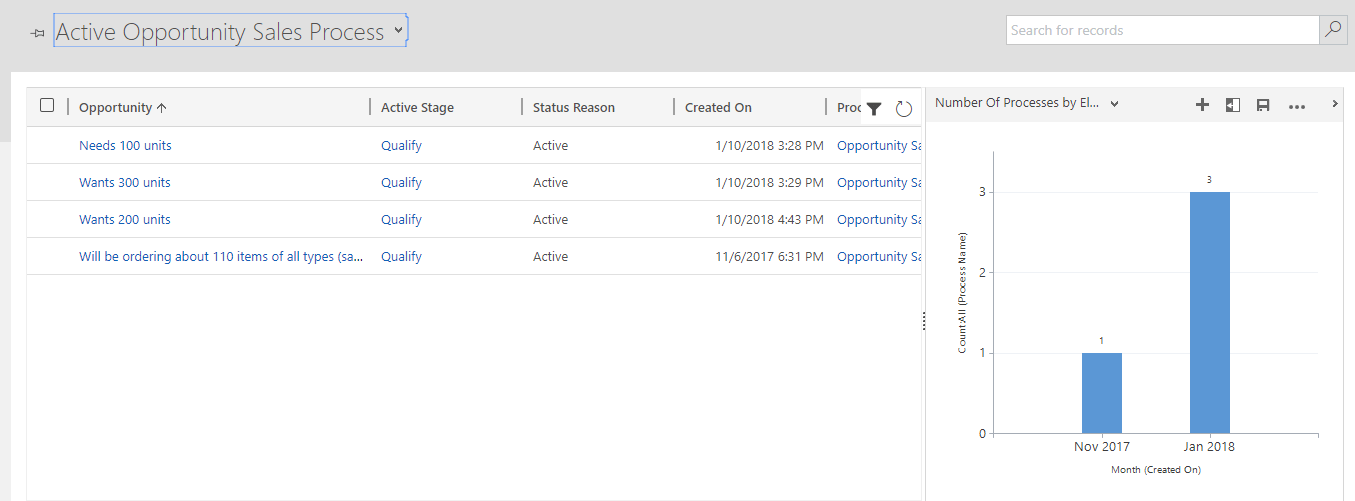
With business processes flows available as a table, you can now use advanced finds, views, charts, and dashboards sourced from business process flow data for a given table, such as a lead or opportunity. System administrators and customizers can create custom business process flow grids, views, charts, and dashboards similar to those created with any other table.
Business process flows, such as Lead To Opportunity Sales Process, appear as a customizable table in solution explorer.
To access a default business process flow view, open solution explorer, expand Tables > expand the process that you want, such as Lead To Opportunity Sales Process, select Views, and then select the view that you want.
Several default views are available that you can view as a chart, such as the Active Opportunity Sales Process view.
Interact with the business process flow table from a workflow
You can also interact with business process flow tables from a workflow. For example, you can create a workflow for the Business Process Flow table row to change the Active Stage when a column on the Opportunity table row is updated. For more information about how to do this, see Automate business process flow stages using workflows.
Run business process flows offline
You can use business process flows offline if the following conditions are met:
The business process flow is used from a Power Apps app.
The Power Apps app is enabled for offline use.
The business process flow has a single table.
Specifically, the three commands that are available for a business process flow when the Power Apps app is offline are:
Next stage
Previous stage
Set Active stage
Lookup column in a business process flow stage
Recent rows are visible in a lookup column in the unified interface. To prevent the most recently used items from showing up in the lookup, follow these steps:
Select the correct environment from the top right.
On the left navigation pane, select More > Tables.
Search for your table and select your business process flow table.
In the Data Expressions group, select Forms.
On the Forms screen, select Information.
Select your lookup data step from the Tree view, and then check Disable most recently used items.
Save and then publish.
Limitations of using business process flow tables
Currently, you can’t create custom forms for tables based on a business process flow.
If a solution includes a business process flow table, the business process flow table must be manually added to the solution before you export it. Otherwise, the business process flow table won’t be included in the solution package. To learn more, go to create and edit tables.
Business process flows will show the name of the BPF instance, which is set at the time that the BPF instance is created. This means if the name in the BPF definition changes, new BPF instances will display the updated name, but older BPF instances will display the original name. It also means localized BPF definition names aren’t displayed.
Welcome to the era of digital employee onboarding! In today’s remote, or hybrid working landscape, it’s crucial to have a seamless and engaging onboarding process for your new hires. Say goodbye to traditional onboarding programs and embrace the power of digital solutions.
With Microsoft Teams, you can create an easily accessible and efficient digital onboarding experience. In this article, we’ll explore the benefits of digital onboarding, and showcase how Microsoft Teams can transform your onboarding programs.
On-site, Hybrid, or Remote Working – Digital Onboarding is the way to go
Digital employee onboarding offers scalability and flexibility, no matter if your new hires are starting in the office or remote working.
Remote and hybrid working has become the norm, and digital employee onboarding is the key to success. Embrace the flexibility and scalability of remote work by utilizing digital processes. Leave behind the hassles of traditional onboarding and welcome new hires with open arms through a digital onboarding experience. Offer them easy access to information, resources, and tools necessary for a smooth transition.
Digital onboarding solutions streamline the way you welcome new team members. Simplify administrative tasks and make the onboarding process a breeze. Say goodbye to stacks of paperwork with digital offer letters and contracts. Create a digital onboarding process with digital onboarding checklists that guide new hires through essential tasks. Boost employee engagement with interactive training materials, fostering a positive digital onboarding experience. These digital processes enhance efficiency and create a seamless
Microsoft Teams: Your Digital Onboarding Ally
Microsoft Teams is the ultimate tool for transforming your digital employee onboarding process. It provides an all-in-one platform for communication, collaboration, and knowledge sharing.
When used to its full potential, Microsoft Teams can become a truly powerful onboarding platform.
When onboarding new hires, many players are involved, including the IT team, the HR department, and the hiring manager. The responsibility for kicking off the digital onboarding process often falls on the shoulders of the IT team, but should it?
With the help of advanced Microsoft Teams templates and a well-defined Teams provisioning and approval process, it doesn’t have to. Harness the potential of Microsoft Teams templates designed specifically for onboarding new employees to jumpstart your digital onboarding program.
A Team template pre-built by your IT team can come with pre-built channels, tabs, documents, links, and integrations. Using the new team the new hires can connect with their team members, ask questions, and access important resources. The HR rep or the hiring manager can create a new Team from a template when the digital onboarding process is started.
You can create a custom look and feel (a theme), for your app by making changes to the default colors and visual elements provided in the uncustomized system. For example, you can create your personal product branding by adding a company logo and providing table-specific coloring. A theme can be created by using the Themes area, without requiring a developer to write code. You can create, clone, change, or delete themes that are used in your environment.
Are you looking for ways to save your business money in 2023? The Power Platform offers a variety of tools that can help you streamline your operations and cut costs. In our latest YouTube video, “7 Ways to Save Your Business Money in 2023 with Power Platform“, we’ll show you how to use the Power Platform to improve your business’s efficiency and save money.
What is the Power Platform?
The Power Platform is included with Office 365, so if you already have Office 365, you already have access to the Power Platform. The platform includes Power Apps, Power Automate, and Power BI, which can be used to create custom apps, automate workflows, and create data visualizations. These low code/no code tools offer you unlimited possibilities for creating custom business apps without the expense of large-scale development projects.
Inspection and Reporting Apps with Power Apps
One effective way to reduce costs for your business is by creating a custom Power Apps Inspection and Reporting app. PowerApps can be used to streamline various types of inspections, such as vehicle inspections, product evaluations, and job checklists. By using PowerApps, you can eliminate the need for paper-based processes and expensive off-the-shelf software that may not fully meet your needs. PowerApps is user-friendly, low-code/no-code platform, making it accessible even if you have little to no coding experience. You can easily design an app that aligns with your specific business processes, rather than having to conform your processes to fit a pre-existing app.
Automate customer contacts and leads with Power Automate
Another way to save your business money is by using Power Automate for new customer intake and response. This can help you automate the process of responding to new customer inquiries and can save you time and money on labor costs. In the video, you will see an example Power Automate flow we use here at PowerApps911 for handling the thousands of contacts our website gets from people like you. It involves Cognito, SharePoint, Teams, MailChimp, and a whole lot of Cloud Flow automation.
Lots of options in the Human Resources space
Power Apps can also be used to create custom Human Resources apps with Power Apps. These apps can help you automate HR processes such as employee onboarding and can also help you manage employee data. This can save you time and money on labor costs, as well as help you ensure that you’re complying with HR regulations. Some examples discussed include Offboarding/Onboarding, Kudos, Time Off requests, Performance review/goal tracking, and a full demo of how we do Job Tracking for our small business.
Invoices: Add Artificial Intelligence to reduce human workloads
The Power Platform also includes AI Builder, which can be used to create custom AI models without writing code. One way to use AI Builder is for invoice scanning. By automating the invoice scanning process, you can save time and money on labor costs, and also reduce the risk of errors.
One example is doing double entry batching. Let the AI scan the invoice or receipt and extract the values. Then have a human do the same. If the human and AI got the same values, then move the invoice along. If there is a discrepancy, then start a manual reconciliation process. This will allow you to greatly reduce data entry errors without doubling the human workload.
What is AI Builder?
AI Builder is a feature within the Power Platform that allows users to create custom AI models without the need for specialized coding knowledge. It enables non-technical users to leverage pre-built templates and use their own data to train models that can perform tasks such as image recognition, text classification, and form processing. With AI Builder, businesses can automate tasks such as invoice scanning, sentiment analysis, and predictive maintenance, and integrate the AI models into their Power Apps and Power Automate workflows, to improve efficiency and save time and money.
Expense and Spending management
Power Apps can also be used to manage expenses and spending. You can create custom apps that help you track expenses, manage budgets, and even create custom reports. This can help you save money by identifying areas where you can cut costs. Every business has the need to track and report on spending. Let the Power Platform help you build solutions that fit your business exactly.
Inventory and Asset Management
In addition, the Power Platform can also be used for inventory and asset management. This can help you keep track of your inventory and assets and can also help you automate the process of ordering and tracking inventory. This can save you time and money on labor costs. Whether you track things today using Excel, Access, or just good ole pen and paper you can do better with the Power Apps and Automate. One of our construction customers replaced a six figure a year 3rd party tool with a custom Power App.
Our favorite customer example we built
Their app takes a user through the whole process. First you use a desktop Power App to create a Purchase Order. Adding vendors and products from an easy-to-use process. Once the PO is ready to go, they submit it via the app, it is then automatically turned into a PDF and sent directly to the vendor for fulfillment. When the products show up IT uses a mobile Power App to find, receive the order into inventory. The app uses the built in barcode scanner to scan serial numbers and asset tags. Now the items are in inventory they are assigned and distributed to the users. Nothing over the top. Just a simple app that is 100% tailored to their business process.
Timesheets or time tracking are easy wins
Finally, the Power Platform can be used to create custom timesheets, which can help you automate the process of tracking employee time. This can save you time and money on labor costs, and also help you ensure that you’re complying with labor regulations. One customer saw massive ROI with their timesheet app because not only did they track hours, but they used the app to track equipment used on the job, which was billable back to their client. Their custom timesheet app literally made them money.
The Queensland Police Service (QPS) is very proactive in training its officers, so that they better equipped to fulfil their duties.
To organise this training, QPS has taken to SharePoint Online as way of advertising courses for potential applicants to view and then apply to attend.
Although the move to SharePoint Online did make things easier, there was a need to streamline the process and make it more efficient. The problems faced included:
Applications being received by email, which then had to be forwarded to other personnel to approve or register
Delays in decisions
No trace of progress for an application
Applications not being acknowledged and officers missing the opportunity to attend training
The task
QPS reached out to 365 Evergreen to help them use Microsoft 365 and the Power Platform to tackle the inefficiencies of their existing processes within the South Brisbane district.
What we did
To help the QPS achieve its goals, 365 Evergreen leveraged the existing SharePoint site that was developed by the SBD team and added additional functionality:
A canvas app that allowed applicants to view more details about courses
An application form for applicants to complete and submit
Workflows that notified senior officers of applications
An interface for senior officers to approve applications and leave comments
Workflows to update details in SharePoint and notify applicants of the outcome
The outcome
The process for managing course applications has been significantly improved, with a big reduction in turnaround time and resources.
To date, this solution has been rolled out to three QPS districts and the intent is to roll out the solution to all QPS regions within the next few months.
Creativity and teamwork are essential to transforming business processes. Most processes center on content – files and data. SharePoint offers tools to gather and manage data in lists and libraries.
Microsoft 365 provides connections to a range of third-party systems with Power Automate and Power Apps. Power Automate lets you automate business processes, and Power Apps lets you create great forms and mobile apps based on SharePoint files and data. Both Power Automate and Power Apps feature intuitive visual designers, so anyone can craft forms and screens using a convenient interface.
Power Automate
Using Power Automate, you can create workflows through an easy-to-use visual designer that will guide you through each step and help authenticate your accounts.
Select from dozens of pre-made templates to start automating your app’s usage. Here are just a few applications of these templates:
Create a new record in Microsoft Dynamics CRM when a new list item is added to a SharePoint list.
Copy new members from MailChimp lists to SharePoint lists.
Move files to different folders after they’re approved in SharePoint.
Create a new item in SharePoint when a new order is added in Salesforce.
Route finished documents to a team for approval.
Whether you start with a template or begin from scratch, using Power Automate to create automation features is intuitive.
Power Apps
Using Microsoft Power Apps, you can create apps with a point-and-click approach to app design. Options include using automatically-generated, pre-made templates, or customizing the tool to fit your more specific needs. After your app is complete, you can instantly publish it to Windows, the web, iOS, and Android.
Classic mobile and web apps typically required separate coding for each platform, which can be costly and time-consuming to do—especially with developers in high demand. Instead, Power Apps simplifies the process so anyone can do it. Its easy-to-use, browser-based visual designer helps you rapidly build custom business apps without having to write any code.
By connecting Power Apps to your existing systems and data, you can quickly build reports, forms, and workflows, and then publish your app instantly to all users in your organization.
Power Apps also lets you easily customize the form for a SharePoint list. For example, with custom forms, you can:
Show or hide certain fields.
Reorganize those fields.
Change the layout of a form.
Add formatted text and graphics.
When you publish your changes, the form is embedded within the SharePoint list for use by all of its users.
Cross-tool functionality seamlessly moves your data from one operation to another. With SharePoint being a core component of the Microsoft 365 suite, your data easily integrates with tools like Excel or Power BI reporting. And because it uses an Excel-inspired expression language, these tools talk with each other, using formula language you already recognize and understand to integrate your data from one function to the next.