Category: Microsoft 365

  • Streamline the employee onboarding journey

    Streamline the employee onboarding journey

    Welcome to the era of digital employee onboarding! In today’s remote, or hybrid working landscape, it’s crucial to have a seamless and engaging onboarding process for your new hires. Say goodbye to traditional onboarding programs and embrace the power of digital solutions.

    With Microsoft Teams, you can create an easily accessible and efficient digital onboarding experience. In this article, we’ll explore the benefits of digital onboarding, and showcase how Microsoft Teams can transform your onboarding programs.

    On-site, Hybrid, or Remote Working – Digital Onboarding is the way to go

    Digital employee onboarding offers scalability and flexibility, no matter if your new hires are starting in the office or remote working.

    Remote and hybrid working has become the norm, and digital employee onboarding is the key to success. Embrace the flexibility and scalability of remote work by utilizing digital processes. Leave behind the hassles of traditional onboarding and welcome new hires with open arms through a digital onboarding experience. Offer them easy access to information, resources, and tools necessary for a smooth transition.

    Digital onboarding solutions streamline the way you welcome new team members. Simplify administrative tasks and make the onboarding process a breeze. Say goodbye to stacks of paperwork with digital offer letters and contracts. Create a digital onboarding process with digital onboarding checklists that guide new hires through essential tasks. Boost employee engagement with interactive training materials, fostering a positive digital onboarding experience. These digital processes enhance efficiency and create a seamless

    Microsoft Teams: Your Digital Onboarding Ally

    Microsoft Teams is the ultimate tool for transforming your digital employee onboarding process. It provides an all-in-one platform for communication, collaboration, and knowledge sharing.

    When used to its full potential, Microsoft Teams can become a truly powerful onboarding platform.

    When onboarding new hires, many players are involved, including the IT team, the HR department, and the hiring manager. The responsibility for kicking off the digital onboarding process often falls on the shoulders of the IT team, but should it?

    With the help of advanced Microsoft Teams templates and a well-defined Teams provisioning and approval process, it doesn’t have to. Harness the potential of Microsoft Teams templates designed specifically for onboarding new employees to jumpstart your digital onboarding program.

    A Team template pre-built by your IT team can come with pre-built channels, tabs, documents, links, and integrations. Using the new team the new hires can connect with their team members, ask questions, and access important resources. The HR rep or the hiring manager can create a new Team from a template when the digital onboarding process is started.

  • 365 Evergreen empowers the Queensland Police Service to effectively manage training courses

    365 Evergreen empowers the Queensland Police Service to effectively manage training courses

    The challenge

    The Queensland Police Service (QPS) is very proactive in training its officers, so that they better equipped to fulfil their duties.

    To organise this training, QPS has taken to SharePoint Online as way of advertising courses for potential applicants to view and then apply to attend.

    Although the move to SharePoint Online did make things easier, there was a need to streamline the process and make it more efficient. The problems faced included:

    • Applications being received by email, which then had to be forwarded to other personnel to approve or register
    • Delays in decisions
    • No trace of progress for an application
    • Applications not being acknowledged and officers missing the opportunity to attend training

    The task

    QPS reached out to 365 Evergreen to help them use Microsoft 365 and the Power Platform to tackle the inefficiencies of their existing processes within the South Brisbane district.

    What we did

    To help the QPS achieve its goals, 365 Evergreen leveraged the existing SharePoint site that was developed by the SBD team and added additional functionality:

    • A canvas app that allowed applicants to view more details about courses
    • An application form for applicants to complete and submit
    • Workflows that notified senior officers of applications
    • An interface for senior officers to approve applications and leave comments
    • Workflows to update details in SharePoint and notify applicants of the outcome

    The outcome

    The process for managing course applications has been significantly improved, with a big reduction in turnaround time and resources.

    To date, this solution has been rolled out to three QPS districts and the intent is to roll out the solution to all QPS regions within the next few months.

  • Employee recruitment and on-boarding with Office 365 and Power Platform – Pt 1

    Employee recruitment and on-boarding with Office 365 and Power Platform – Pt 1

    In the series of posts, we are going to look at how you can utilise the suite of Office 365 and Power Platform products to automate the recruitment and onboarding of new employees. We will use (among other things) SharePoint Online, Microsoft Teams, PowerApps, Power Automate, Word, Outlook and Power BI.

    We’ll also apply some JSON to format columns and create adaptive cards

    The scenario

    In this scenario, we will start with a request to recruit a new employee, which will then go through an approval process and trigger a series of actions within Power Automate flows.

    During this series, we’ll also create a Microsoft Team to store all details of applications and supporting documents (resumes, cover letters, etc.)

    Request to recruit

    To begin with, we’ll create a SharePoint team site (mine is called People Culture Team). In this site, we’ll create list (mine is called Recruitment Requests). My list has the following columns:

    NameType of column
    TitleSingle line of text
    Type of requestChoice
    (choices are ‘backfill’ & ‘new position’
    Position TitleSingle line of text
    New Position JustificationMultiple lines of text
    Previous Incumbent NameSingle line of text
    Previous Incumbent Reason For LeavingChoice
    (choices are ‘Internal Transfer’ & ‘Termination (including resignation’
    Covered By BudgetYes/No
    Request LocationChoice (for this example, you only need to have two or three choice. In real-life/larger company, you may prefer a lookup column)
    Reports ToPerson or Group
    Reports To PositionSingle line of text
    Employment TypeChoice (My choices are ‘Full-time’, ‘Part-time’, ‘Casual’ & ‘Fixed-term contract’
    Recruitment MethodChoice (My choices are ‘External’ & ‘Internal’)
    Commencement DateDate and time (Date only)
    Position Description AttachedYes/No
    Base SalaryCurrency
    SuperCurrency (might not apply to any readers outside of Australia)
    Mobile AllowanceCurrency
    Laptop AllowanceCurrency
    Link To RequestSingle line of text (we will use JSON to format this column in a later post)
    P&C ApproverPerson or group
    P&C OutcomeSingle line of text
    P&C CommentsMultiple lines of text
    SLT ApproverPerson or group
    SLT OutcomeSingle line of text
    SLT CommentsMultiple lines of text
    GM ApproverPerson or group
    GM OutcomeSingle line of text
    GM CommentsMultiple lines of text

    If you don’t want to manually create this list, here’s a flow I created for you. You just need to change the URL to one that sits inside your tenant, e.g. https://yourtenant.sharepoint.com/sites/peoplecultureteam, and run the flow.

  • Finding your feet with PnP PowerShell part 1

    Finding your feet with PnP PowerShell part 1

    Introduction

    In this series, we will look at PnP PowerShell discover what it is and how it can be used to manage your Microsoft 365 tenants. In this post focus on what PnP PowerShell is, how to install at and run some simple cmdlets.

    What is PnP PowerShell?

    Microsoft describes PnP PowerShell as ‘a cross-platform PowerShell Module providing over 500 cmdlets that work with Microsoft 365 environments.’

    These cmdlets focus primarily on:

    • SharePoint Online
    • Microsoft Teams
    • Microsoft Planner
    • Power Automate.

    How to install PnP PowerShell

    Before you can install the PnP PowerShell module, you’ll need to have already installed the SharePoint Online Management Shell, from the PowerShell Gallery.

    You can see if you already have the SharePoint Online Management Shell installed, by open running PowerShell as an administrator.

    1. From the start menu, search for PowerShell and ‘Run ISE as Administrator’
    • In the window that opens, paste the below and hit the green play button

    Get-Module -Name Microsoft.Online.SharePoint.PowerShell -ListAvailable | Select Name,Version

    • To then install the latest version, paste the below line and hit the green play button

    Install-Module -Name Microsoft.Online.SharePoint.PowerShell

    • In the pop-up window that appears, select ‘Yes to All’ and wait for the installation to finish. If you already have the latest version, a message will tell you so.

    Now that PnP has successfully been installed, you can start to remotely administer our tenant.

    How to connect to your tenant with PnP PowerShell

    It only takes one cmdlet to connect to your tenant with PnP PowerShell.

    1. In the PowerShell window paste the below, replacing the bold caps with your tenant domain and your 365 username and hit the green play button:

    Connect-SPOService -Url https://YOURTENANT-admin.sharepoint.com -Credential LOGIN@DOMAIN.com

    • Enter your password in the pop-up window that appears.

    If you tenant use multi factor authentication, you can use the below cmdlet and enter your credentials in the pop-up window that appears.

     Connect-SPOService -Url https://YOURTENANT-admin.sharepoint.com

    And that’s it. You’ve now installed PnP PowerShell and connected to you Microsoft 365 tenant. In the next post, we’ll look at executing some of the most common cmdlets for SharePoint Online.

  • Build a policies and procedures hub with Microsoft 365 – Part 01

    Build a policies and procedures hub with Microsoft 365 – Part 01

    Introduction

    Policies and procedures play an essential role in any organisation and it is essential that employees have access to the latest documentation.

    By combining SharePoint and the Power Platform, it is quite easy to create a robust solution that can mange the creation and dissemination of these documents, as well as tracking who has

    In this series of posts, we will:

    • create a policies and procedures team site SharePoint
    • create site columns using the tenant-wide term store
    • use Power Automate to send notifications to readers and creators
    • create a PowerApp to allow users to acknowledge that they have read and understood the document
    • create a policies and procedures hub (using the PnP modern search web parts)
    • create a Power BI dashboard to show reports

    Pre-requisites

    The following instructions are written with the assumption that you have exposure to SharePoint and the Power Platform, as well as sufficient privileges, e.g., Tenant global admin, Term store admin, etc..

    Create terms

    We’re using the term store to provide values for the metadata in the site columns used in the policies and procedures document library.

    You can always skip this step and create other types of columns, e.g., choice or lookup.

    The beauty of using the term store is that the metadata can be used in sites across your whole tenant, i.e., you don’t need to replicate terms for each site collection.

    To create new terms in the term store:

    • Go to Microsoft 365 admin center
    • Select see all > SharePoint
    • Select Content services > Term store
      (https://YOURTENANT-admin.sharepoint.com/_layouts/15/online/AdminHome.aspx#/termStoreAdminCenter)
    • Select Add term group
    Modern term store experience
    • Give the term group a name (we’re using Policies and Procedures)
    • Within this group, create the following term sets and values:
      • Business unit
        • Accounts
        • Business support
        • Finance
        • HR
        • IT
        • Operations
      • Document type
        • Guideline
        • Manual
        • Policy
        • Procedure

    For information about the term store, click here.

    To learn how you populate the term store using Power Automate, click here.

    The SharePoint team site

    Now, we’ll create a SharePoint team site to store the policy and procedure documents. This site will also contain the lists that will be used to track the status of documents, e.g., who has and who hasn’t read a document.

    The team site we are using is called Polices & Procedures Team (https://TENANT.Sharepoint.com/sites/PoliciesProceduresTeam).

    Site columns

    We now need to create the site columns (they need to be site columns to make use of the search functionality later on).

    Use a good naming convention for the internal name for your columns, e.g., create a column called BusinessUnit and rename it Business unit afterwards. This prevents special characters appearing the name of the column.

    The site columns we need to create are:

    NameType
    Business UnitManaged metadata
    (use Business unit term set we just created)
    Document typeManaged metadata
    (use the Document type term set we just created)
    Document ownerPerson or group
    Published dateDate and time
    (Date only)
    Next review dateDate
    (Date only)
    Date assignedDate
    (Date only)
    Assigned toPerson or group
    Acknowledgement statusSingle line of text
    (Default value is Assigned)

    Content types

    Next we need to create the content types and add the necessary site columns.

    NameParentColumns
    Policy and procedure documentDocumentBusiness unit
    Document type
    Document owner
    Published date
    Next review date
    Policy and procedure taskItemAssigned to
    Date assigned
    Acknowledgement status

    Library and list

    Next, we need to create a document library (rather than using Shared documents) and a task list. We’re calling our library ‘Policy and Procedure documents’ and our list ‘Acknowledgements’.

    To make things easier and repeatable, e.g., to move between environments, we have created a site design that you can download from here.

    Next steps

    In this post, we have configured the SharePoint team site that will be used to store our policies and procedures, as well as a list that will track who has and who has not read each document.

    In Part 02, we’ll use PowerApps to create a simple canvas app that displays a list of documents for a user to acknowledge.

  • Easily convert Word documents to PDF with Power Automate

    Easily convert Word documents to PDF with Power Automate

    Converting a Microsoft Word document in SharePoint to PDF is a great way to prevent further editing, but traditionally it was difficult to automate without code or a third-party plugin.

    Now, though, Microsoft Flow makes it quite straight forward.

    In the below tutorial, I’m going to show you how to create a flow to convert documents to PDF using just six steps (with the help of OneDrive for Business).

    Screenshot of Microsoft Flow for converting Word document into PDF

    I’m going to assume you know how to create flows and are familiar with actions, connections and dynamic content.

    Creating the flow

    1. In this example, we’ll create a flow from blank and use the ‘for a selected file’ trigger.

    Screenshot of Microsoft Flow - Creating a flow from blank and use the ‘for a selected file’ trigger.

    2. Then, we’ll enter the details of the site collection and document library that we want to run workflow on.

    Screenshot of Microsoft Flow - Details of the site collection and document library to run workflow on.

    3. Then, we’ll add a new step for the ‘get file properties’ action. This is where we identify the file to convert. Use the same site address and library name as the previous step and choose ‘FileId’ from the options in dynamic content.

    Screenshot of Microsoft Flow - 'Get file properties' action.

    4. Now that we know which document to convert, we need to get the content of the document. To do this, add the ‘Get file content’ action. Use the same site address as before and choose ‘Identifier’ from the dynamic content.

    Screenshot of Microsoft Flow - 'Get file content' action.

    5. Now we need to create the document in OneDrive for Business (you may need to set up the connection if it hasn’t already been set up). For the folder path, navigate to the folder that will store the documents you want to convert. I’m using ‘Files for conversion’.

    For the file name, use ‘File name with extension’ from the dynamic content. For the file content, select ‘File Content’ from the dynamic content.

    Screenshot of Microsoft Flow - 'Create file' action.

    6. Next, use the OneDrive for Business ‘Convert file’ action. Use ‘Id’ from dynamic content to populate the file field. Type ‘PDF’ into the target type.

    NB: The ‘convert file’ action doesn’t create a PDF in your One Drive for Business file.

    Screenshot of Microsoft Flow - 'Convert file (Preview)' action.

    7. Now the convert action file has been added, add a ‘Create file’ action. I’ve used the same site collection and document library as earlier but you can create the convert file in other site collections or libraries.

    For the file name, use ‘Display name’ from the dynamic content. For the file content, select ‘File Content’ from the dynamic content.

    Screenshot of Microsoft Flow - 'Create file' action.

    Converting a document

    1. Back in SharePoint, go to  the document library that was used to create the flow.
    2. Select the document that you want to convert and then select ‘Flow’. From here choose ‘Convert Word to PDF’.

    Screenshot of SharePoint - Flow tab and relevant drop down options

    3. Select ‘Run flow’.

    4. The flow will run.

    5. Your Word document has now been converted to PDF.

    Next steps

    Now that you know how to convert Word documents to PDF, you can expand this flow to complete further actions, such as email the PDF as an attachment, send notifications, delete the newly created file from OneDrive, or archive the original Word document.

  • Enterprise Content Management with Office 365

    Enterprise Content Management with Office 365

    Marketing materials, contracts, email messages, client presentations and pitches, spreadsheets, text files, .pdfs, photos, videos, forms, invoices, resumes from job applicants. Organizations small and large are content-creating machines. And while creating that content might come easily, keeping it organized is no small feat.

    That’s where enterprise content management (ECM) solutions come in. They allow you to organize and manage your content throughout its life cycle – from creation to archive. But just like everything, all enterprise content management systems aren’t created equally – so let’s take a look at some of the features that can help keep your content organized (and accessible), while helping your team function more efficiently.

    • A single repository for a diverse range of content types: By choosing an ECM service that allows you to store video, spreadsheets, images, text documents, and more in a single location, you can keep all of your files for a specific project or initiative together.
    • Create main folders with a virtually endless number of subfolders: This way, if you have a project or initiative that’s ongoing or occurs annually, you can simply create one main folder for, say, Trails Cleanup, then create subfolders for every year that you work on the initiative. Within each of those subfolders you could create additional subfolders for things like contracts, volunteer release forms, marketing materials, etc.
    • Easily edit document properties, or metadata: With the power to locate and edit a file’s metadata from within a document, you can save time and ensure that files are labeled correctly for future searches.
    • Control access to information: Not everyone in an organization needs access to every document, and with an ECM that allows you to apply defined permissions to documents, groups of files, entire sections of the system, or to the system itself, you can tightly control who sees what.
    • Work collaboratively: Some ECM solutions allow you to create document workflows that make it possible to track and collaborate with others on document-oriented processes using the programs that you already rely on.
    • Play media content from within your enterprise content management system: For organizations that use video and audio files, the ability to play media from within the ECM can save your team time by reducing the number of steps required to view or listen to it.
    • Store and protect business records and important legal files: With a secure repository, you can ensure that your records are not only stored in a locked, and final state, but that they’re easy to locate and retrieve if they’re ever required in legal discovery. And, with convenient access to all of your documents, it can help reduce your overall discovery costs.
    • Keyword search: An EMC service that allows users to search for documents and information by keyword can help your team locate files that they may not be aware of, but may that be relevant to a project they’re working on – which can help them save time and work more efficiently. Searchable areas should include the document text, metadata, annotations, etc. In addition, documents should also be searchable by creation date.
    • Accessible on a range of devices: By choosing an enterprise content management solution that is designed for use on desktops, laptops, tablets and phones, users can access the files they need, when they need them – whether they’re at the office, working remotely, traveling, or at an off-site meeting.

    With the power to store, secure, locate, manipulate and create files and documents in a single location, enterprise content management services make it possible to streamline team communication, project work, and even legal discovery. And whether your organization has just a few employees in a single office or it consists of thousands of people worldwide, an enterprise content management system can help you stay organized.

  • Setting up PnP PowerShell

    Setting up PnP PowerShell

    It is quite easy and quick to set up PnP PowerShell on a local system and start using it. Considering that PnP PowerShell has been gaining a lot of momentum among Devs and Admins, thought it would be good to have a post for everyone’s reference.

    So why PnP PowerShell? Because it is the recommended and most updated PowerShell module for IT Pros to work on SharePoint Online, SharePoint On-premises and Office 365 Groups. It allows us to remotely mantain the SharePoint and Office 365 tenancy as we will see below.

    Installation:

    First, we have to make sure that we have the latest and greatest version of PowerShell (at least >= v4.0) on the system. We can simply check it using the following command $PSVersionTable.PSVersion which will give the output below.

    PowerShell Version Check

    If your version isn’t sufficient, then go to this link to upgrade – https://www.microsoft.com/en-us/download/details.aspx?id=40855. Since there are OS requirements accompanied with PowerShell, please make sure to check the System Requirements in order to make sure the OS matches the specs.

    Also, I would recommend installing SharePoint Online Management Shell because there are various Tenant commands that you may not find in PnP PowerShell. The link can be found here – https://www.microsoft.com/en-au/download/details.aspx?id=35588. Again, make sure to check the System Requirements in order to make sure the OS matches the specs.

    After you have the proper PowerShell version, run the following commands to install the PnP PowerShell module depending on if you’re using the Online or On-Premise version.  You only need to install the version(s) you need to interact with (no need to install on premise versions if you’re only working online).

    SharePoint VersionCommand to install
    SharePoint OnlineInstall-Module SharePointPnPPowerShellOnline
    SharePoint 2016Install-Module SharePointPnPPowerShell2016
    SharePoint 2013Install-Module SharePointPnPPowerShell2013

    It will take few mins to run and complete the above commands, then it will ready for use.

    Get Started guide:

    To start using PnP PowerShell, first we will have to understand how does PnP PowerShell works.

    PnP PowerShell works in the context of the current Connection the site it is connected to. Assuming it is connected to a Site Collection, all commands refer by default to that Site Collection. This is different from SPO commands which require you to have Tenant Admin rights. A benefit of the PnP approach is that you can have separate Admin personnel to manage separate site collections or sites if needed.

    Overview of Basic SharePoint Operations with PnP PowerShell

    1. Connect to PnP Online

    Connect-PnPOnline -Url <sitecollectionUrl>

    In case, you are not given a prompt for entering your credentials, then create a credential object and pass it to the Connect command.

    $user = "<test user>"
    $secpasswd = ConvertTo-SecureString "<password>" -AsPlainText -Force
    $mycreds = New-Object System.Management.Automation.PSCredential ($siteOwner, $secpasswd)
    Connect-SPOnline -url $siteAdminURL -Credentials $mycreds

    2. Get the web object using Get-PnPSite and then get the subsites in it

    ## For Site Collection
    $web = Get-PnPSite  
    
    ## For Sub web
    $web = Get-PnPWeb -Identity "<Subsiteurl part only>"

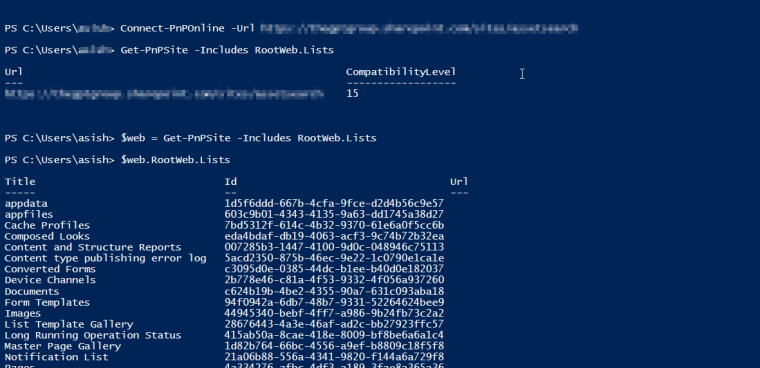
    3. In order to work on lists or objects of the site, use the “Includes” parameter to request them or else they will not be intialized.

    $web = Get-PnPSite -Includes RootWeb.Lists
    PnPPowerShell output

    After you get the list object you can traverse it as needed using the object.

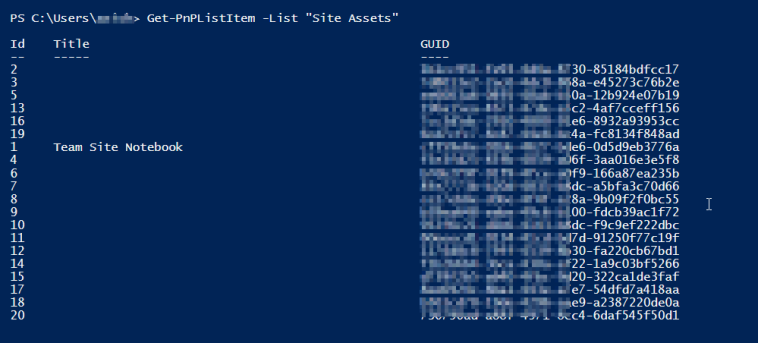
    4. To work on list items, you must request the list items and same goes for updating the items.

    $listItem = Get-PnPListItem -List "Site Assets"
    DocumentResults
    Set-PnPListItem -List "Site Assets" -Identity 2 -Values @{"<column>" = "<value"}
    PnPPowerShell_UpdateItem

    So as we saw above, we could use PnP PowerShell to maintain the SharePoint assets remotely.