Blog

  • PowerApps components

    PowerApps components

    What are components?

    Components are reusable building blocks for canvas apps. You can define a set of controls to reuse inside an app. You could import a component into other apps as well. They behave in a master-instance manner, meaning that any updates you make to the original (‘master-instance’) will apply to other copies in the same app.

    So think of a header for your app: you create it once and if you were to change its text, that change would be reflected across each instance within the app.

    Below is a clip introducing components including some of the terminology to know.

    Advanced customization

    Not only can you reuse a set of controls, but you can also define more advanced behaviors with custom properties.

    Today, controls have properties such as Fill, Color, Height, Width, etc. out of the box. When you create your own component, you can invent your own properties of every data type: value, text, record, and table to name a few.

    What you can do with custom properties is only limited by your imagination.

    More experienced makers will want to make controls inside of a component shrink and expand as it is resized. Relative positioning and sizing are best practices now as they have been before this feature.

    Getting Started

    Components are now available as an experimental feature. Follow these steps to get started.

    1. Open the PowerApps Studio.
    2. Go to App settings > Advanced settings.
    3. Turn on “Components” in Experimental features.
    4. In the Tree View, select “Components” and you will land on a square canvas.

    Import and Export a Component

    One effective way of learning a new skill is to see how others have done it. You can watch the video below on how to create your own Header component.

    You can also download and walk through the sample header used in the video.

    1. Download this msapp file for a Header Component.
    2. Start a new blank app in PowerApps.
    3. Click Insert > Components > Import component > Browse for the .msapp file.
    4. The component will appear on the dropdown menu for inserting components.
    5. Click Insert > Components > Header to insert the header.

    Making App Building Easier

    In this first release of components, please take the time to know its current limitations. You can read the full documentation for more details.

    • Instance: a master-instance of a component is scoped to the app. It is a local master. This means that changes you make to the master-instance only affect the copies of the component within the app. The changes do not affect the copies in other apps.
    • Images: it is not yet possible to package media files when importing a component, but this feature is coming soon.
    • Collections: using Collect within a component is not yet fully supported.
    • Data sources: data sources are not saved with components.

    This experimental feature is a step towards better reusability and scalability for more complex apps and distributed app building. The development effort is continuing, and more capabilities are on the way.

    Resources

    Feature Documentation

    Video: Introduction

    Video: Header Component

  • Transform your SharePoint list with a formatted view

    Transform your SharePoint list with a formatted view

    In this post, I’m going to show you how transform a SharePoint list form this…

    …to this.

  • Enterprise Content Management with Office 365

    Enterprise Content Management with Office 365

    Marketing materials, contracts, email messages, client presentations and pitches, spreadsheets, text files, .pdfs, photos, videos, forms, invoices, resumes from job applicants. Organizations small and large are content-creating machines. And while creating that content might come easily, keeping it organized is no small feat.

    That’s where enterprise content management (ECM) solutions come in. They allow you to organize and manage your content throughout its life cycle – from creation to archive. But just like everything, all enterprise content management systems aren’t created equally – so let’s take a look at some of the features that can help keep your content organized (and accessible), while helping your team function more efficiently.

    • A single repository for a diverse range of content types: By choosing an ECM service that allows you to store video, spreadsheets, images, text documents, and more in a single location, you can keep all of your files for a specific project or initiative together.
    • Create main folders with a virtually endless number of subfolders: This way, if you have a project or initiative that’s ongoing or occurs annually, you can simply create one main folder for, say, Trails Cleanup, then create subfolders for every year that you work on the initiative. Within each of those subfolders you could create additional subfolders for things like contracts, volunteer release forms, marketing materials, etc.
    • Easily edit document properties, or metadata: With the power to locate and edit a file’s metadata from within a document, you can save time and ensure that files are labeled correctly for future searches.
    • Control access to information: Not everyone in an organization needs access to every document, and with an ECM that allows you to apply defined permissions to documents, groups of files, entire sections of the system, or to the system itself, you can tightly control who sees what.
    • Work collaboratively: Some ECM solutions allow you to create document workflows that make it possible to track and collaborate with others on document-oriented processes using the programs that you already rely on.
    • Play media content from within your enterprise content management system: For organizations that use video and audio files, the ability to play media from within the ECM can save your team time by reducing the number of steps required to view or listen to it.
    • Store and protect business records and important legal files: With a secure repository, you can ensure that your records are not only stored in a locked, and final state, but that they’re easy to locate and retrieve if they’re ever required in legal discovery. And, with convenient access to all of your documents, it can help reduce your overall discovery costs.
    • Keyword search: An EMC service that allows users to search for documents and information by keyword can help your team locate files that they may not be aware of, but may that be relevant to a project they’re working on – which can help them save time and work more efficiently. Searchable areas should include the document text, metadata, annotations, etc. In addition, documents should also be searchable by creation date.
    • Accessible on a range of devices: By choosing an enterprise content management solution that is designed for use on desktops, laptops, tablets and phones, users can access the files they need, when they need them – whether they’re at the office, working remotely, traveling, or at an off-site meeting.

    With the power to store, secure, locate, manipulate and create files and documents in a single location, enterprise content management services make it possible to streamline team communication, project work, and even legal discovery. And whether your organization has just a few employees in a single office or it consists of thousands of people worldwide, an enterprise content management system can help you stay organized.

  • Setting up PnP PowerShell

    Setting up PnP PowerShell

    It is quite easy and quick to set up PnP PowerShell on a local system and start using it. Considering that PnP PowerShell has been gaining a lot of momentum among Devs and Admins, thought it would be good to have a post for everyone’s reference.

    So why PnP PowerShell? Because it is the recommended and most updated PowerShell module for IT Pros to work on SharePoint Online, SharePoint On-premises and Office 365 Groups. It allows us to remotely mantain the SharePoint and Office 365 tenancy as we will see below.

    Installation:

    First, we have to make sure that we have the latest and greatest version of PowerShell (at least >= v4.0) on the system. We can simply check it using the following command $PSVersionTable.PSVersion which will give the output below.

    PowerShell Version Check

    If your version isn’t sufficient, then go to this link to upgrade – https://www.microsoft.com/en-us/download/details.aspx?id=40855. Since there are OS requirements accompanied with PowerShell, please make sure to check the System Requirements in order to make sure the OS matches the specs.

    Also, I would recommend installing SharePoint Online Management Shell because there are various Tenant commands that you may not find in PnP PowerShell. The link can be found here – https://www.microsoft.com/en-au/download/details.aspx?id=35588. Again, make sure to check the System Requirements in order to make sure the OS matches the specs.

    After you have the proper PowerShell version, run the following commands to install the PnP PowerShell module depending on if you’re using the Online or On-Premise version.  You only need to install the version(s) you need to interact with (no need to install on premise versions if you’re only working online).

    SharePoint VersionCommand to install
    SharePoint OnlineInstall-Module SharePointPnPPowerShellOnline
    SharePoint 2016Install-Module SharePointPnPPowerShell2016
    SharePoint 2013Install-Module SharePointPnPPowerShell2013

    It will take few mins to run and complete the above commands, then it will ready for use.

    Get Started guide:

    To start using PnP PowerShell, first we will have to understand how does PnP PowerShell works.

    PnP PowerShell works in the context of the current Connection the site it is connected to. Assuming it is connected to a Site Collection, all commands refer by default to that Site Collection. This is different from SPO commands which require you to have Tenant Admin rights. A benefit of the PnP approach is that you can have separate Admin personnel to manage separate site collections or sites if needed.

    Overview of Basic SharePoint Operations with PnP PowerShell

    1. Connect to PnP Online

    Connect-PnPOnline -Url <sitecollectionUrl>

    In case, you are not given a prompt for entering your credentials, then create a credential object and pass it to the Connect command.

    $user = "<test user>"
    $secpasswd = ConvertTo-SecureString "<password>" -AsPlainText -Force
    $mycreds = New-Object System.Management.Automation.PSCredential ($siteOwner, $secpasswd)
    Connect-SPOnline -url $siteAdminURL -Credentials $mycreds

    2. Get the web object using Get-PnPSite and then get the subsites in it

    ## For Site Collection
    $web = Get-PnPSite  
    
    ## For Sub web
    $web = Get-PnPWeb -Identity "<Subsiteurl part only>"

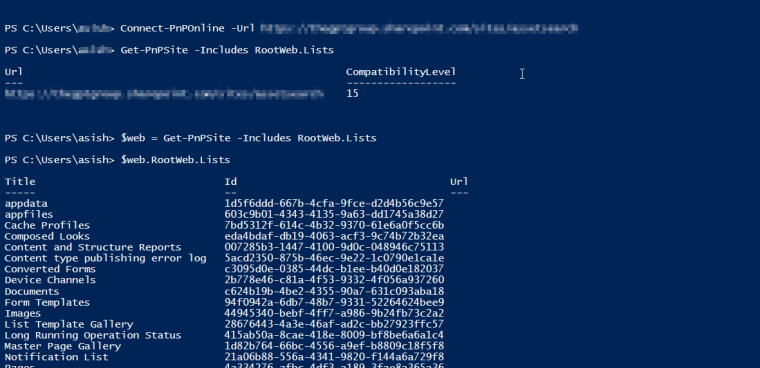
    3. In order to work on lists or objects of the site, use the “Includes” parameter to request them or else they will not be intialized.

    $web = Get-PnPSite -Includes RootWeb.Lists
    PnPPowerShell output

    After you get the list object you can traverse it as needed using the object.

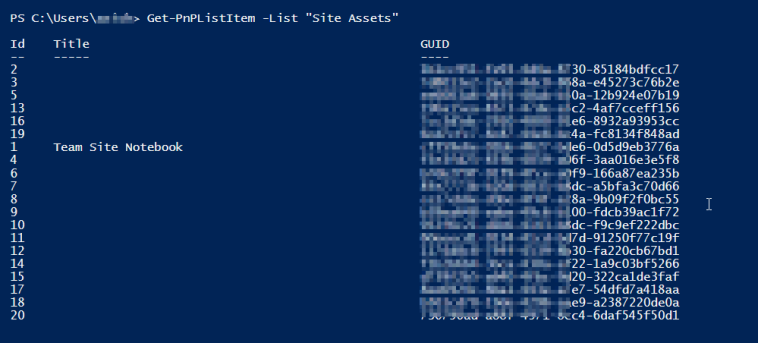
    4. To work on list items, you must request the list items and same goes for updating the items.

    $listItem = Get-PnPListItem -List "Site Assets"
    DocumentResults
    Set-PnPListItem -List "Site Assets" -Identity 2 -Values @{"<column>" = "<value"}
    PnPPowerShell_UpdateItem

    So as we saw above, we could use PnP PowerShell to maintain the SharePoint assets remotely.

  • Cascading look ups in Microsoft PowerApps

    In this post, I’ll show you how to create a cascading dropdown that posts back to lookup fields in SharePoint.

    Backend Configuration

    I have two lists in SharePoint Online:

    1) Projects – This list holds project information such as the Project #, Project Name, Description, etc. The list has multiple Project #’s.  A single Project # can be associated with multiple Project Names.

    Figure 1 – Projects List Configuration

    2) Project Hours – This list has two lookup fields: One that looks up the Project # from the Projects list and another that looks up the Project Names from the Projects list.

    Figure 2 – ProjectHours List Configuration

    Desired Functionality

    When the user creates a new item in the Project Hours list, we want them to select a distinct Project # and have that filter out the list of Project Name’s to show only Project Names associated with the selected Project Number.

    Figure 3 – Desired Outcome of Cascading Dropdowns

    The Issue

    You cannot apply the functions to accomplish the cascading functionality directly with the SharePoint Lookup control.

    The Work-Around

    We will need to add two separate Drop Down Controls in the app and apply our cascading function to those controls.  We can then set the Default Value of our SharePoint Lookups to the values of our Drop Down Controls so that they are written back to SharePoint.

    Here are the Steps to Achieve this:

    **I’m going to glance over the basics of creating the PowerApp itself and highlight how to do the cascading piece.

    1. Create a Blank PowerApp
    2. Add a Data Source to the Projects and Project Hours Lists
    3. Add an Edit Form to your PowerApp and include the Project # and Project Name fields
    4.  Insert two Dropdown Controls – One called PrjNumb and another called PrjName
    5. Change the “Items” property of the PrjNumb Dropdown to the following:Distinct(Projects,Title)

    The Distinct function ensures that we only receive unique Project #’s.  This is important because in our Projects lists we have multiple records with the same Project # (See Figure 1).  If we did not have the Distinct function then we would see the same Project # value listed twice.  For the Distinct function, you need to pass in the name of your Data Source first followed by the Field in your Data Source that you want to return.

    Figure 4 – Project # Drop Down Formula

    6. Change the “Items” property of the PrjName DropDown to:Distinct(Filter(Projects,Title = PrjNumb.Selected.Value),Project_x0020_Name)

    In this function we are using the Distinct function again to ensure we get unique values.  Within the Distinct function we are applying a Filter function. Within the Filter we are passing in the name of the Data Source followed by our filter function which is where the Project # (which is the Title field in that list) is equal to our selected value in our Project Number Drop Down field in our PowerApp.  We are then telling it that we want this Drop Down control to return the Project Name’s as our value options.

    Figure 5 – Project Name Filtered Drop Down

    7. Change the “Default” property of your SharePoint Project Number Lookup field to:

    {
    ‘@odata.type’ : “#Microsoft.Azure.Connectors.SharePoint.SPListExpandedReference”,
    Id: Value(LookUp(Projects,Title=PrjNumb.Selected.Value,ID)),
    Value: PrjNumb.Selected.Value
    }

    To set the default value of a SharePoint Lookup column, you have to tell it the ID of item in the list as well as the text value.  The text value in this case is just the selected value of our PrjNumb Drop Down field.  To get the ID of that, we have to use a LookUp function.  In that we will pass in the name of our Data Source, followed by a function that says where the Title (Project # value) is equal to our selected Project Number in our form.  We then tell is to return the ID field value.

    Figure 6 – Project # SharePoint Lookup Default Value Configuration 

    8. Change the “Default” property of your SharePoint Project Name Lookup field to:{‘@odata.type’ : “#Microsoft.Azure.Connectors.SharePoint.SPListExpandedReference”,Id: Value(LookUp(Projects,Project_x0020_Name = PrjName.Selected.Value,ID)),Value: PrjName.Selected.Value}

    Figure 7 – Project Name SharePoint Lookup Default Value Configuration

    That’s all there is to it.  You now have cascading dropdowns that will update your SharePoint Lookup Columns.